
Welcome to day three of DIY Wedding Week! Yesterday we made DIY Wedding Table Numbers, and today we're using a lot of the same materials to make DIY wedding program fans. We decided that we didn't want a big program booklet since we're trying to keep everything short and sweet, and a program fan will help keep our guests cool in the middle of July. We printed our bridal party information with a short note to friends and family on the front, and used printed cardstock for the back side of the fan.

Things you'll need:
- Assorted patterned cardstock
- Cardstock in your wedding color, and a printer to print on the cardstock with
- Paint stirrer sticks – one per guest
- White paint
- Hot glue and hot glue gun (we tried adhesive spray and a glue stick, the hot glue worked best)
- A corner rounder
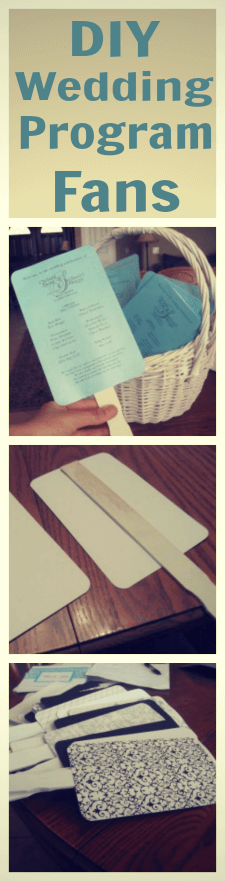
1) Paint the stirrer sticks white.
2) Trim the colored cardstock and the patterned cardstock to 8″ by 5″.
3) In Microsoft Word, click File>Page Settings>Paper. Change the height to 8″ and the width to 5″. Type the names of your bridal party along with whatever message you want to appear on the fan. Print this onto the wedding-colored cardstock. Ours said something along the lines of this:
Welcome to the wedding celebration of
Chelsea Nicole and Nathaniel Day
July 10, 2010
Mount Soledad
La Jolla, California
Officiant
Billy Bob Thornton
Best Man Maid of Honor
Joe Montana Angelina Jolie
Groomsmen Bridesmaids
Kevin Spacey Britney Spears
Kevin Federline Beyonce Knowles
John Goodman Jennifer Garner
Flower Girl Ring Bearer
Mulan Stitch
We would like to express our gratitude to our parents
for their love and guidance throughout our lives.
We also thank our friends and family
for joining us today and sharing our joy.
We ask God's blessing on our marriage.
4) Lay the patterned piece of cardstock face-down on a table, apply hot glue to a paint stirrer stick, and glue the stick to the cardstock.

5) Apply hot glue around the edge of the cardstock, and lay your program cardstock piece down to complete the fan.


That's it! I put ours in a basket for the ushers to hold (or set on a table, because all of the fans together is actually pretty heavy).

Adorable!!!!
Sadie, Sadie (almost) Married Lady! Have a wonderful time this weekend. Looking forward to the pictures!
I can't believe it! When you're back on your blog you'll be a Mrs. I really hope you had time to take pictures of all the beautiful crafts you lovingly made for you special day — and if not you, hopefully a photographer did!
Have a wonderful honeymoon, and post, post, post when you get back!!!
Love,
Suzette
What thickness card stock did you use?
Standard 65lb. It was pretty sturdy once it was complete, though it would have been just fine if it were heavier.